What to Consider Before Installing Open Kitchen Shelving
From hanging and floating shelves over the main food prep area to freestanding shelves situated on the wall in place of cabinetry, open shelving in kitchen design has truly come alive in the last few years. Once implemented into kitchens as the bare beginnings of kitchen storage solutions, open shelving is more tied to farmhouse-style kitchens and minimalist design ideas these days. As attractive as these modern open-storage solutions may be, they are not a good fit for every kitchen or every kitchen user. Here are a few things to consider about open kitchen shelving and whether or not they are the best kitchen shelving option for you!
Closed Cabinetry Does Have Its Perks
Things evolved from crude shelving to closed cabinetry over the years for good reasons. With closed cabinets, you can tuck away all the clutter and keep the kitchen looking tidy. For the most part, regular cabinets are a logical shelving concept. Before you start thinking about how to style open kitchen shelves in your kitchen layout, it's best to consider if you really want to eliminate all your cabinets or just a few.

Open Shelves Require a Bit of Forethought
You know how you currently unload the dishwasher quickly and slap everything in the cabinets? If you are going to be using open shelves for something like storing dishes, some old habits will have to change. Everything that you place on your open shelves will have to be carefully considered and organized. Otherwise, your kitchen wall shelving could end up with a mess of clutter that makes your entire kitchen look messy. Some people like the idea of using open shelves to display things like pasta and ingredients, such as flour, sugar, and spices. This can look nice, but, again, you'll have to be careful with what you choose to have on open display.
Open Shelving Must Be Properly Installed
This is a huge thing to consider. If you have picked up a DIY kit and are wondering how to install open shelving in kitchen areas, you may want to reach out to a professional to get the job done right. There are all kinds of ways shelving can be installed, but the shelving has to be completely stable, anchored securely, and capable of holding heavy weight. Consider just how many pounds a shelf full of glasses would weigh and now think about how easy it will be for such weight to strip a good screw right out of the wall. With this in mind, installing shelves is better left to the experts.

You Must Pick the Best Location
Houzz provides a good list of open shelving kitchen idea locations, but the real good options are going to change according to your kitchen layout or design. For example, open shelving over the sink may be nice for some homes, but a lot of kitchens have a window over the sink, so this placement might not work.
Takeaways to Remember Before Installing Open Kitchen Shelving
- Closed cabinetry will always have its perks; a collaboration of open & closed shelving is always a good mix.
- Open shelving installation is usually not a DIY task.
- Picking the best location will make all the difference in how happy you are with the end result.
- Once installed, your open shelving becomes a design element of the space, along with everything on the shelf.
Open Shelving Installation in NJ
Many people are perfectly happy with the unique open shelves they have installed in their kitchen, but this is a major change to make and should be carefully considered. For more help with how to pick open shelving or cabinetry for your kitchen remodel, reach out to us at RWC Windows, Doors & More.
Window Cleaning Tips
When you consider all the ways your windows can collect grime and dirt, you may realize that even windows that may look fairly clean - are not! Dirty or damaged commercial or residential windows stick out like a sore thumb. The collection of environmental, airborne pollution on exterior surfaces and the accumulation of grease, dust, and fingerprints inside will require window cleaning techniques that will deep clean glass surfaces. According to the EPA, your home furnishings that are manufactured with man-made materials are a source of poor indoor air quality and can also leave an invisible film or oily fog on windows.
Tips on Window Cleaning
Good window cleaning removes built up grime without leaving dirt or water streaks. The best window cleaner is made at home using 50% white vinegar and 50% tap water. Mix this solution in a spray bottle and add just a 1/2 teaspoon of dish detergent like Dawn. The acid in vinegar will cut through the greasy, filmy residue while the soap will collect the dirt to be washed away.
If you don't have vinegar handy, some good substitute combinations with include distilled water and Vodka, cornstarch and ammonia, warm water and lemon juice, or dish soap and rubbing alcohol. You can find the recipes here.

Cleaning the Outside of Your Windows
Most double hung window sashes will tilt in for easy exterior cleaning. If your windows are single pane windows or sliding windows, a soft bristle brush on an extension pole (or a microfiber cloth wrapper around a Swiffer mop) can be used to reach upper window sections.
For second level windows, you don't really need a ladder if you have a garden hose. Purchase a spray bottle that can be attached to a hose (similar to the liquid fertilizer bottles). Add your solution and begin spraying upper level windows with a strong force of cleaning solution. Follow by using the water hose to rinse windows with clear water, before the solution dries completely.
Interior Window Washing Tips and Tricks
When cleaning interior windows you may want to lay a large bath towel on the floor for protection. Begin your project by cleaning the window tracks where dirt and mud can accumulate. Clean window tracks with a butter knife wrapped in a microfiber cleaning cloth and dipped in a baking soda and vinegar solution will speed up the process.

Spray windows and allow the solution to sit for a minute. You can use a sponge, microfiber cloth, or newspaper to wipe the windows from the top to the bottom. Use a separate cloth for a final, streak-free wipe down.
Your grandparents may have used newspaper to wipe clean interior windows. This is still an excellent way to get smear-free windows, as long as the newspaper ink is not petroleum based which causes the ink to transfer and smear. Not to worry, 90% of all newspapers use the cheaper, soy-based ink which does not smear.
Use the bristles of a small brush (like a toothbrush) to get into joints and hardware to remove built up grime. This also a useful tool for cleaning the lower portion of your window screen.
Frame and Window Sill Cleaning Tips
The last steps in cleaning the interior windows is to clean the frame and window sill which will have gathered much of the dirt you've washed away from the glass pane.
You may want to scrub your metal window frame with a toothbrush and your window cleaning solution. If window frames are really grimy, sprinkle baking soda on the frames first (getting into the grooves and corners). Follow that by spraying with your vinegar and water solution, then scrubbing with a toothbrush. Wipe your window frames clean and dry with a microfiber cloth.
Finally, wipe down your window trim and sills with clean soapy water, followed by wiping with a damp cloth, then drying with a clean cloth. Avoid allowing the water to sit on the wooden sills for too long.
Take-Aways
- A 50-50 solution of white vinegar and water will leave your windows clean and streak-free
- When cleaning windows, also clean the window tracks, frame, and window sill
- Allow cleaning solution to sit a minute - but do not allow to dry
If your window frames are rusty or damaged and your windows panes discolored or show signs of mold growth, consider replacement windows installed by RWC Windows, Doors, and More. RWC also provides bathroom and kitchen remodeling, along with door installation and window replacement to homeowners in northern New Jersey.
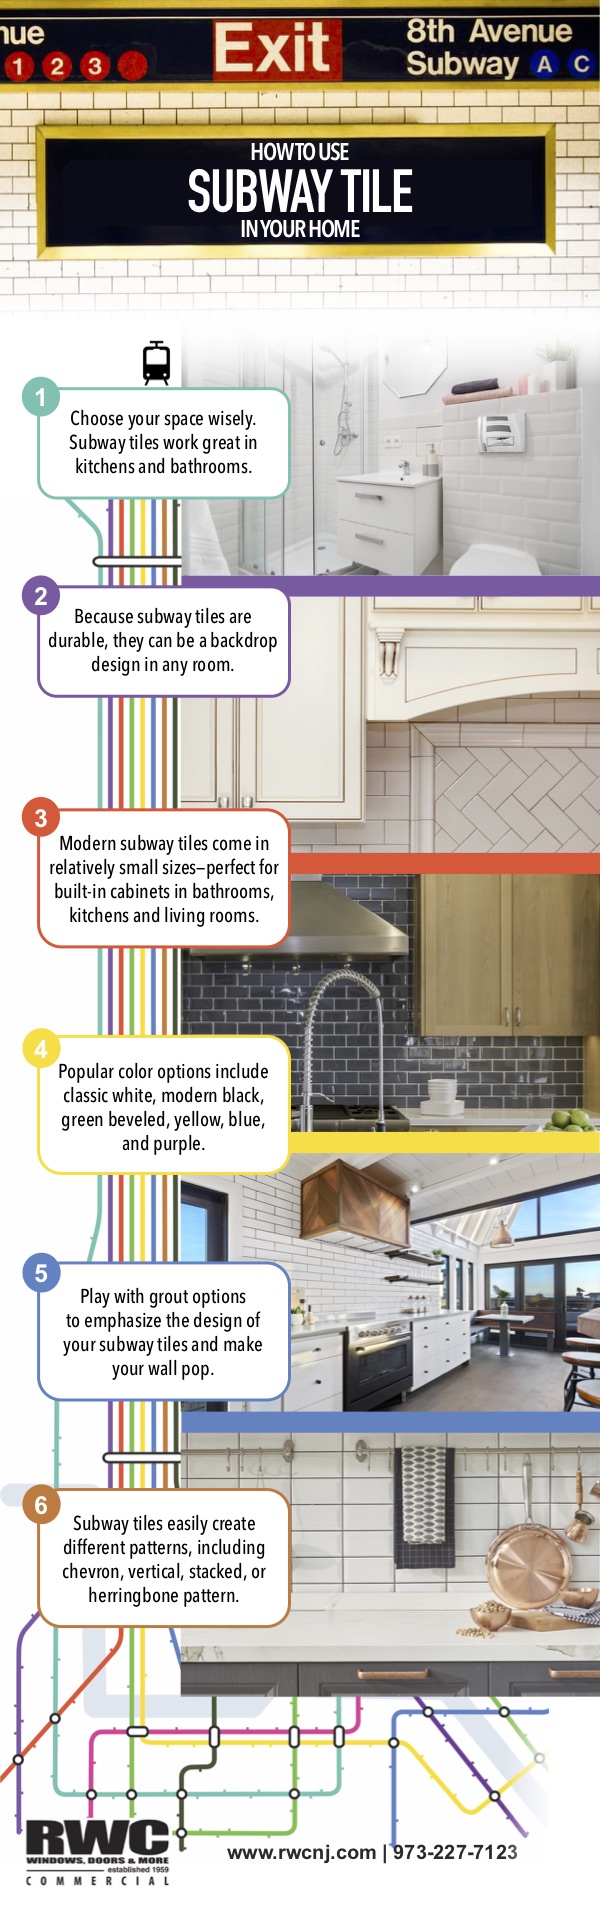
How To Use Subway Tiles In Your Home [Infographic]
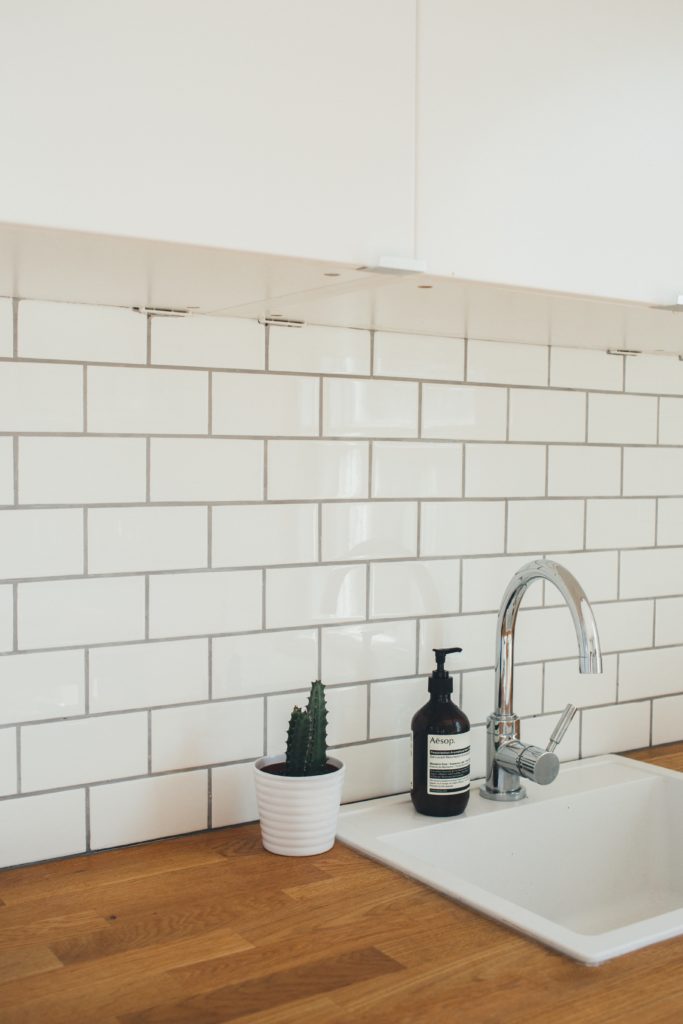
Subway tiles were first used in the early 1900s when the New York City Subway was being built. These clean and bright ceramic tiles were ideal for reflecting light within the subterranean transit system and creating a welcoming space for the city’s commuters. Today, subway tiles are used everywhere from chic hotel restrooms to the modern family kitchen. This classic style is a favorite of designers and homeowners because it offers a crisp and simple feel. And while many choose to go with the traditional white subway tiles for their kitchen or bathroom, they can now be found in a variety of materials, sizes, and colors.
 Subway Tiles And Your Space
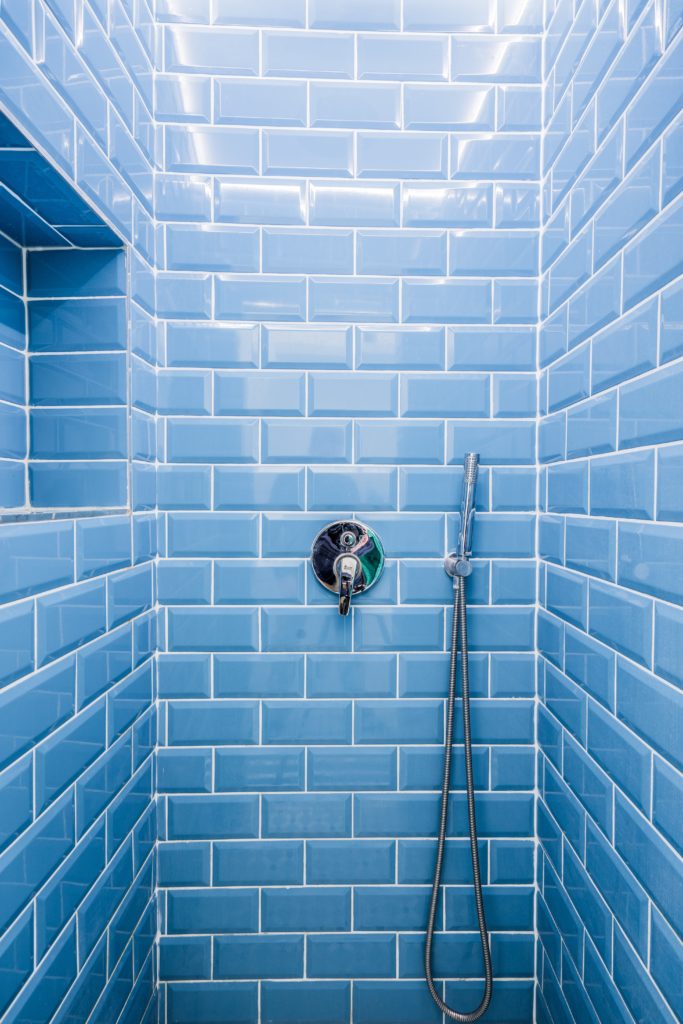
Choose your space wisely, but don’t stress too much -- subway tiles work great in kitchens, bathrooms, and every other room. Because subway tiles are durable, they can also be used as a backdrop design in just about any room - including bedrooms and living rooms. Most modern subway tiles still come in relatively small sizes, so they are great for putting in around built-in cabinets in bathrooms, kitchens and living rooms.
It’s acceptable to play with different colors and sizes when choosing subway tiles in your bathroom or kitchen. The original subway tiles created by designers George C. Heins and Christopher Grant La Farge in 1904 were 3-by-6-inch rectangles. But since then, times have changed, and homeowners can choose from a wide variety of different sized subway tiles. The most popular sizes for modern subway tiles include 3x6, 4x12, and 4x16. Some popular color options include classic white, modern black, green beveled, yellow, blue, and purple.
Great Grout!
Standard-edge and beveled-edge subway tiles always look great with traditional white grouting, allowing for clean lines and a uniform design. Another option for updating the look of your subway tiles while still keeping the clean design that they offer is to change up the grout color. A classic white subway tile can instantly look more modern and chic with the addition of grey grout work. Subway tiles in a bathroom can really pop when used with different grout colors. Playing with different grout options is one way to emphasize the design of your subway tiles and make your tiled wall pop!
Alternating tiles or developing a unique pattern using different tile colors is a simple way to create contrast in any space. A good tip? Try laying your favorite tiles down on the floor or countertop and try using a different color or contrasting tile every 5 to 10 tiles to come up with a pattern you’ll love.
 Mix It Up With Pattern and Color
Subway tiles make it easy to create many different patterns. So, if alternating tiles aren’t your favorite, you could also try laying them down in a chevron pattern, off-center, vertical, stacked, or in a herringbone pattern to create more dimension. Subway tiles for a kitchen can be used in backsplashes, walls or counters.
Tired of traditional ceramic? Try these alternative ideas to spice up subway tiles:
- While many homeowners choose to use traditional ceramic subway tiles, there are a variety of different material options available on the market today. Some alternatives to ceramic subway tiles include porcelain, glass, and metal.
- Additional pattern options include diagonal, basketweave, vertical basketweave, corridor horizontal, corridor offset horizontal, and brickwork vertical.
In Summation
- Subway tile is good everywhere in your home - bathroom, kitchens, backsplashes and more.
- Change up your grout color to make subway tile different in every room in your home.
- You have almost unlimited pattern and material options! Check out some design ideas for your home here to draw inspiration.
Whether you’re interested in creating a fabulous design for an entirely redesigned modern subway tile bathroom or you’re limiting the home renovation to a classic subway tile shower, the possibilities are endless when you go with such a classic material. And with so many styles, colors and pattern options, you can really have some fun with the design process. No matter the size or style of the subway tiles that you choose, your final home renovation project will certainly have lasting appeal and help to transform your kitchen or bathroom into a welcoming and timeless space in your home. For more subway tile options and installation information, call (973) 435-4230 or visit the team at RWC Windows and Doors online today to request a quote.
3 Ways Vertical Storage Can Help Reduce Clutter In Your Home
Reduce Clutter In Your Home
Whether you live in a small apartment or a home that is a bit short on storage space, clutter can be a major issue. From all the small appliances you use daily in the kitchen to the tons of accessories and supplies you keep in the closet, all those everyday extras need a place to go. If your closets are overflowing, your cabinetry is stuffed, and you're running out of places to stick all that extra stuff, it's time to start looking at storage from a different angle—a vertical one. Check out these cool vertical storage ideas to help you find out how to reduce clutter in a new way.
Implement Vertical Kitchen Storage Racks
People struggle to have ample storage in their kitchen perhaps more than any other room in the house. Vertical kitchen storage racks are a good solution, and these can be found in a range of styles and sizes. These racks can reach all the way to the ceiling and give you multiple tiers for stowing away your excess items, but they can also function as a designer element. You can pick up storage cabinets or create your own out of an old wardrobe and make the new storage an attractive part of your overall kitchen design.
Take Advantage of Vertical Plastic Storage Containers
Storage containers are not at all hard to find, and there are tons out there which are designed to be stackable and stable even if several are stacked on top of one another. You could use something like these stackable storage cube shelves from Home Depot and create new storage possibilities on empty walls in your bedroom, utility room, or kitchen. Even small and inexpensive plastic storage containers can be stacked, and even though these aren't the most attractive, they can be concealed in a closet or behind a decorative wall.
Utilize Vertical Storage for Small Space in a Creative Way
Even if you have a small space with an empty wall, there are ways you can implement vertical storage. For instance, a narrow pegboard can be installed in a small closet or bathroom to create a space where you can hang everything from tools to kitchen utensils. For instance, if you have a small pantry in your kitchen with a free wall, covering this wall with a pegboard would give you a spot to hang small baskets to house single-serve pouches of food, spare utensils, or even pots and pans. You could also pick up some of these creative knobs from IKEA to add a few ways to hang items in a vertical space. In a closet, for example, a series of knobs could be used to hang up coats, ties, belts, and purses.
Takeaways to Remember About Vertical Storage to Reduce Clutter
- Implementing vertical storage can be done without a big budget
- Blank walls give ample opportunities for storage all over the house
- Vertical storage can be integrated into closets where there is a wall available
- Creating storage that reaches from the floor to the ceiling is perfectly doable
- Pegboards, stackable cube storage, and vertical shelves are excellent storage solutions
Living in a clutter-free home helps make you feel more comfortable and confident. No matter how small your space is, vertical storage may be a logical solution if you feel overwhelmed by clutter. Reach out to RWC Windows, Doors, and More to talk about how we can help you with having more space.